Skip to content
  • There are no suggestions because the search field is empty.

Navigating the Groups Tab

Screen_Shot_2022-04-25_at_2.04.58_PM.png

The Digital Reader allows you to create student groups so you can assign books to multiple students in a single place.

This article will cover the following topics:

For a video walk-through, please see Navigating the Groups Tab (Video 5:55). For information on assigning books to a group, please see Navigating the Book Assignments Tab.

Creating Student Groups

To create a student group, follow the steps below. *Please note that student groups are not copied over as part of the Academic Term creation. This means teachers will need to create new student groups for their new classroom each term.

1. From your dashboard, click on Groups.

groups.png

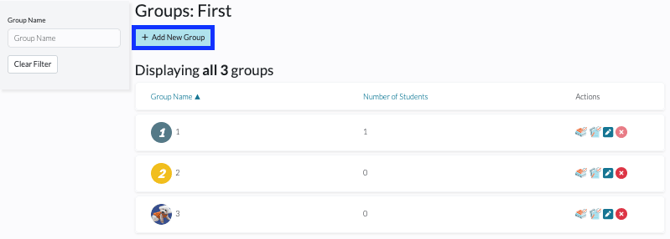
2. Click the Add New Group button.

Screen_Shot_2023-01-31_at_1.16.48_PM.png

3. Give the group a name and click Create.

Screen_Shot_2023-01-31_at_1.19.37_PM.png

4. To adjust the group settings, click on Group Settings.

Screen_Shot_2023-01-31_at_1.21.04_PM.png

5. From here, you can Edit Group Name, Manage Students, or Change Group Icon. You can also delete the group if needed. *Please note, you cannot add students from this page. For instructions on how to add students, please see Adding Students to a Group.

Screen_Shot_2023-01-31_at_1.22.41_PM.png

A few notes about the group icon:

  • Students do not see the group name or the avatar/color icon associated with the group. 
  • If you select a color icon, the letter inside the circle will always be the first letter of that group's name. For example, if your group is called Blue Group, the letter inside the circle will be a B.

Adding Students to a Group

Once you've created your Group, the next step is adding students to that Group. To add students, follow the below steps.

1. From your dashboard, click on Students.

students.png

2. Locate the student you want to add, and click the Pencil icon to the far right. (If you haven't added students to your classroom yet, you'll need to do that first. For information on how to add students, please see How Do I Add Students to My Classroom?).

Screen_Shot_2021-11-04_at_4.19.46_PM.png

3. In the Update Student screen, find the Group drop-down menu and select the group you want to add the student to.

group.jpg

4. Click Update Student to save.

save.jpg

Moving Students between Groups

Moving a student to a different group is simple. There are two ways to do so: from the Students Tab or from the Groups Tab.

From the Students Tab

1. From your dashboard, click on Students.

students.png

2. Locate the student you wish to place in another group, and click the Pencil icon to the right of their name.

Screen_Shot_2021-11-04_at_4.19.46_PM.png

Alternatively, you can click on the student's name and then click on Student Settings with the gear icon located on the student dashboard.

How_Do_I_Change_a_Student_s_Group__2..png

3. This will open the Update Student page. From there you can adjust the student’s group using the drop-down menu under Group. If you wish to remove the student from all groups, select the blank option in the drop-down menu.

group.jpg
4. Click the Update Student button to save.
save.jpg

From the Groups Tab

1. From your dashboard, click on Groups.
groups.png
2. Click on the student's current group. Screen_Shot_2021-11-17_at_2.06.50_PM.png
3. Click on Group Settings.
Screen_Shot_2021-11-17_at_2.07.52_PM.png
4. Click on Manage Students.
Screen_Shot_2023-01-31_at_1.30.11_PM.png
5. Locate the student you wish to move, and use the drop-down menu under Group to select a new group for the student. Screen_Shot_2021-11-17_at_2.09.45_PM.png